
TP - Link wireless router set by the tutorial How to set up TP - graphic Link wireless router
Basic configuration of a wireless router
Script Home reminds you:
The information required is as follows:
1, broadband dial-up user name and password 2, router + network cable (if it is a wireless router does not need to connect to the computer network cable)
If the router forgot password or it's not new can use toothpick by holding down the reset button for 10 seconds or so can reply to factory Settings. (The login user name is usually admin/admin), and the newly purchased router may only need to set the password (admin).
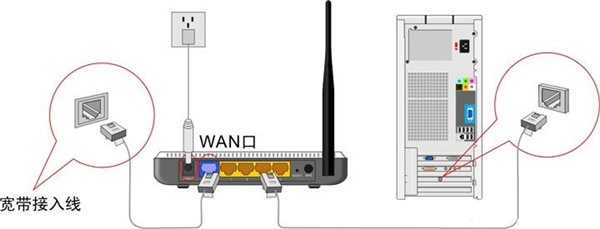
First, hardware connection
We must first understand what jack wireless router, there is useful, first look at the diagram
As shown in the figure below, the WAN port is connected to the broadband incoming line, that is, the network public and LAN ports are connected to the computers in the LAN.
When we configure the wireless broadband router for the first time, refer to the manual to find that the default IP address of the wireless broadband router is 192.168.1.1 and the default subnet mask is 255.255.255.0
Since the configuration interface of TP-LINK TL-WR541G is browser-based, we need to establish the correct network Settings first. We have connected computer A to the LAN port of the wireless broadband router through the network card. Next, we have two ways to set the IP address for computer A.
1, set the IP address of the computer A to 192.168.1. XXX (XXX range is 2 to 254), for example we can input 192.168.1.6, subnet mask 255.255.255.0, the default gateway for 192.168.1.1.
2, set the TCP/IP protocol of computer A to "automatically obtain IP address", and then turn off the power of the wireless broadband router and computer A, first turn on the power of the wireless broadband router, and then start the computer A, so that the built-in DHCP server of the wireless broadband router will automatically set the IP address of computer A.
After completing the above steps, we can use computer A, open an Internet Explorer window, type http://192.168.1.1(in the address bar and enter the default password admin,admin to enter the configuration interface.

This need not be introduced, login after the initial interface, ha ha

After login, first run the setup wizard, I have turned off the login run wizard function, you can click the setup wizard in the left column. Click next as shown in the figure below
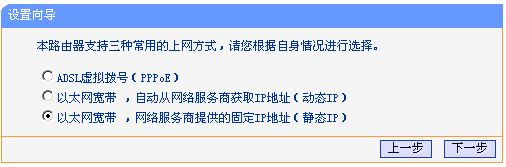
Since I am now in the office, belongs to the construction of a local area network (the same reason), so first introduce the static ip Settings. Click Next to appear in the following format
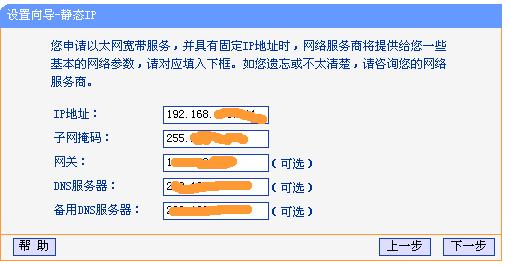
We can now set your external IP and other information, this is only for fixed ip users

If you choose the pppoe setting (broadband dial-up) above, it will pop up the window as shown above, enter your account and pw and click next

After the above Settings, click Next in the first two steps (if you select dynamic ip, you will jump directly to here) will jump to the window shown above. Here we can choose whether to enable the wireless state of the route, which is enabled by default. SSID is the login name used for authentication on the wireless LAN. Only authenticated users can access the wireless network
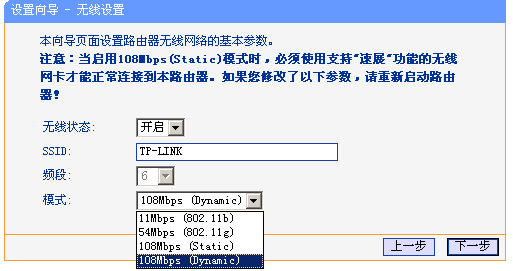
In the mode here, you can choose the bandwidth Settings of 11m, 54m and 108m, a total of four options, only 11m and 54m can choose the frequency band, a total of 1-13 frequency bands for choice, which can effectively avoid the repetition of short distance frequency bands.
You should find that there are two modes in 108m, one is Static mode and the other is Dynamic mode. Note If the static 108m mode is selected, only a wireless NIC that supports the XTM function can be connected. Dynamic or 54m adaptive mode is recommended

After the late version, it will appear as shown in the picture above. Click Finish.

Now we go to the LAN port Settings of the network parameters which is the LAN segment you want to build, and the IP address which is the gateway you are going to use
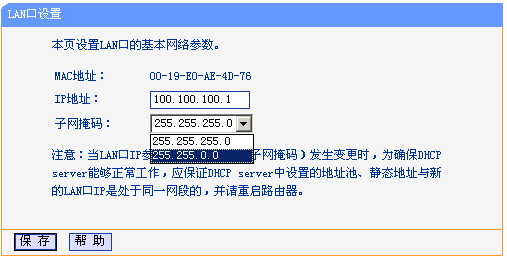
After the IP address is set, the subnet mask is 255.255.255.0 and 255.255.0.0.
If chose 255.255.255.0, up to 254 IP addresses can be used, as I set the IP address of the item description is 100.100.100.1-100.100.100.254 can use, but the router itself takes up. 1 address, so only 253.
If the selected is 255.255.0.0, you can use 100.100.0.1 - in addition to the router between 100.100.255.254 occupy. 1 outside any IP address

Ha ha, this wan port setting is just we use the setup wizard to set up a wide area network (relative to the local area network) information

You should see the figure above wan port connection types have 7 to choose from, according to their own needs to choose, there are not understand the pm I
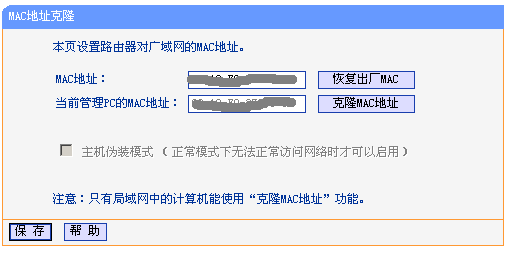
mac address cloning does not need to be introduced in detail, mainly when the external device needs to bind the mac, it needs to be changed to the allowed

This picture is the basic setting of wireless parameters, here is the main description of the security Settings, of course, you have to open can ~ ~ HOHO
There is a lot of knowledge that needs to be introduced here, and we will sort it out when we have time.
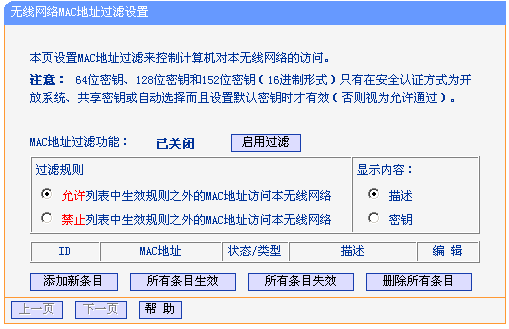
Here you can add allowed or prohibited mac address access to the local area network, the general family, the host is not much, it is recommended to enable the allowed list can be, remember to add allowed mac ah
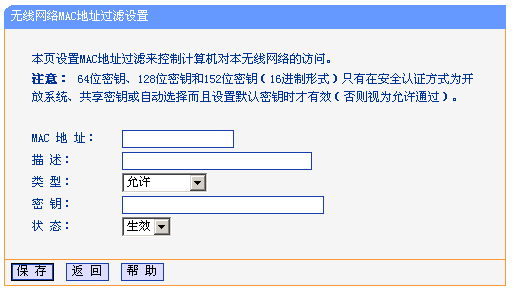
Whether the previous step is to select allow or prohibit the addition in the list will go to the window as shown above, and you can set whether it is allowed or prohibited here, you can choose to take effect or disable, hehe
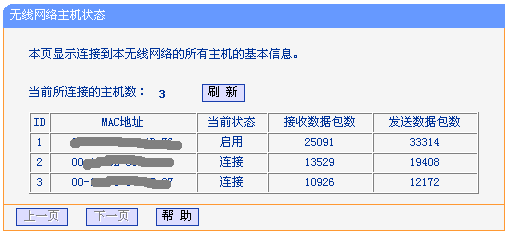
There is no need to explain here, mainly displays the information of the computer and other devices connected to the router and the packet size
To introduce the tp link below wireless router Settings, example is demonstrated new router, if not sure whether the router before is set, then Suggestions for tp - link wireless router reset operation.
Correct reset method of TP-Link wireless router: When the router is powered on, press and hold down the QSS/RESET button on the rear panel for more than 5 seconds and observe the SYS indicator. When the SYS indicator changes from slowly blinking to rapidly blinking, the router has been restored to factory Settings. Release the button and the router will restart.
First, hardware connection
1. Connect the computer directly to the router's LAN port with a network cable. You can also connect the router's LAN port to the hub or switch in the local area network through a network cable, as shown in the following figure.
2, with a network Cable to the router WAN mouth and xDSL/Cable Modem or Ethernet is linked together, as shown in the figure below.
3, connect the power supply, the router will start by itself.

Establish the right network connection
1. Set the computer IP address
Right-click the "Network Neighbor" icon on the desktop and select Properties. In the open "Network Connection" page, right-click "Local Connection" and select properties. In the open "Local Connection Properties" page, select "Intelnet Protocol (TCP/IP)" and click Properties. On the Intelnet Protocol (TCP/IP) Properties page, select Automatically Obtain an IP address and click OK. Specific detailed setting steps diagram reference: fast wireless router Settings
2. Run the Ping command to test the connection with the router
In the Windows XP environment, click Start-Run, enter "cmd" command in the subsequent run window, enter or click OK to enter the interface shown in the following figure.
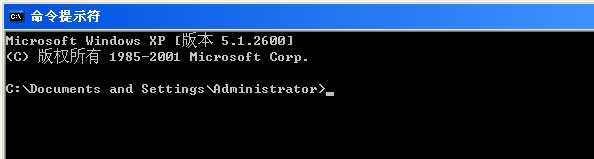
Enter Ping 192.168.1.1 and press Enter.
If the screen shows:

The computer is connected to the router successfully established.
If the screen shows:
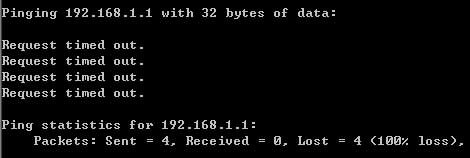
This indicates that the equipment has not been installed, please check in the following order:
1. Is the hardware connection correct?
The Link/Act indicator corresponding to the LAN port on the router panel and the NIC indicator on the computer must be on.
2, the computer's TCP/IP Settings are correct?
If the IP address of the computer for automatic extracting described above, do not need to be set. To manually set the IP, please note that if the IP address of the router is 192.168.1.1, then the computer IP address must be 192.168.1. X (X is between 2 and 254 arbitrary integer), subnet mask must be set to 255.255.255.0, must be set to the default gateway 192.168.1.1.
Three, TP-Link wireless router quick Settings
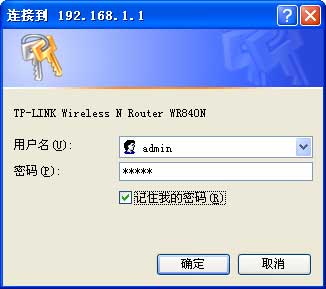
Open the web browser, enter the IP address of the router: 192.168.1.1 in the address bar of the browser, you will see the login interface as shown in the following figure, enter the user name and password (the factory default values of the user name and password are admin), and click the OK button.
The browser will display the setup wizard page as shown in the following figure. If this page does not pop up automatically, you can click the Settings Wizard menu on the left side of the page to activate it.

Click next to enter the Internet access mode selection page as shown in the following figure, here according to our Internet access mode to choose, the general home broadband users are pppoe dial-up users. Here we choose the first option and let the router select it automatically.


After setting, click Next, you will see the basic wireless network parameter setting page as shown below.
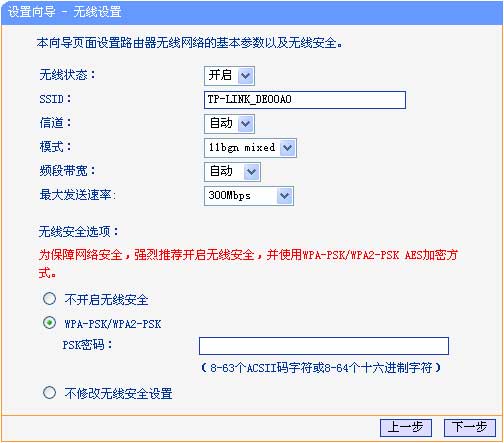
Wireless status: Enables or disables the wireless function of the router
SSID: set as a string to identify the wireless network
Channel: Set the wireless signal frequency band of the router. Automatic is recommended
Mode: Set the wireless working mode of the router. The recommended mode is 11bgn mixed
Band bandwidth: Set the channel width used for wireless data transmission. The value can be 20M, 40M, or automatic
Maximum sending rate: set up the router wireless network maximum sending rate
Close the wireless security: close the wireless security function, the wrong router wireless network is encrypted, the other person is able to join the wireless network.
WPA-PSK/WPA2-PSK: indicates the encryption mode of the router's wireless network. If this parameter is selected, enter the password in the PSK password. The password must contain 8-63 ASCII characters or 8-64 hexadecimal characters.
Do not change the wireless security Settings: the choice, the wireless security options will remain the last set of parameters. If you have never changed your wireless security Settings, selecting this item will keep the factory default Settings off wireless security.
After the setting is complete, click Next. The setting wizard completion screen as shown in the following figure will pop up. Click Restart to make the wireless setting take effect.

After the reboot, the basic setup of our TP-Link wireless router is complete.
Related article
-
The router can change password router login password and modify the wireless password by tutorial
We do not want to share the Internet user login router to modify the parameters of how to do, the simplest way, or modify the default password of the router, the following for you to introduce the router to change the password including the router login password Settings and wireless password modification two2015-05-12 -
I live in a neighborhood where there are several searchable wireless networks, the signal is weak, one has no password, but rarely can connect.2015-05-13
-
Telecom fiber cat and TP-LINK wireless router connection setup wizard graphic details
First, since the default address of both the HG330 and TP-Link routers is 192.168.1.1, you need to connect the desktop network cable directly to the LAN interface of the TP-Link router, then type 192.168.1.1 into your browser and enter your username and password (default2013-09-01 -
The MTU value of the router is set to the best effect
In our common Windows XP operating system, the default MTU value of the system is 1500, which is a standard Ethernet setting value, and is not suitable for broadband networks2012-11-14 -
Wireless router installation and configuration steps diagram
Many people want to install a wireless router at home, so that their mobile terminals can be connected to the Internet, below we will introduce you to the wireless router installation or configuration, will not be a friend can refer to the ha2013-05-30 -
How do Routers do switches Use routers as switches using setup methods
Friends who manage the network may often encounter such a situation, there are only two routers, but only one network cable, then to achieve multiple computers at the same time to surf the Internet requires a switch, then a redundant router can be used as a switch?2012-10-29 -
In fact, the optical fiber cable and our ordinary telephone line is similar, the difference is that the optical fiber cable does not need to connect the Modem (commonly known as "cat") dial-up Internet access, and only need to connect the optical fiber cable directly to the computer can dial up Internet access, but many users for2013-07-11
-
Method of connecting two routers with one network cable or setting up multiple routers
This article introduces two methods that can be used to connect two or more routers with a network cable, although there are more than two methods to connect two or more routers with a network cable, but Xiaobian thinks that these two methods are the best and easiest, let's see2014-02-15 -
We all know that our computers are now in use x86 servers, it has become now the enterprise business operation standard computing platform, and IPMI interface has become the standard of x86 server management, take a look at the detailed introduction2016-11-15
Latest comments