
WPS正文标题与目录导航不对应? wps目录跟内容对不上的解决办法
现在我们写论文基本上都是用WPS,而一般写论文的过程是先把文章的内容写好之后再去处理文章的目录,但在实际情况当中,很多使用者不知道怎样使用WPS中的自动生成目录功能,而是自己在首页手动编制,如果是论文以后不修改那倒还好点,如果是论文的内容及格式有所调整的话,那么此时目录和正文就对不上号了。我在此介绍一种简单的自动生成目录的方法。
方法一:左键拉选标题,右键设置目录级别。
方法二:
1、打开“WPS文字”后依次点击“格式”→“样式和格式”。
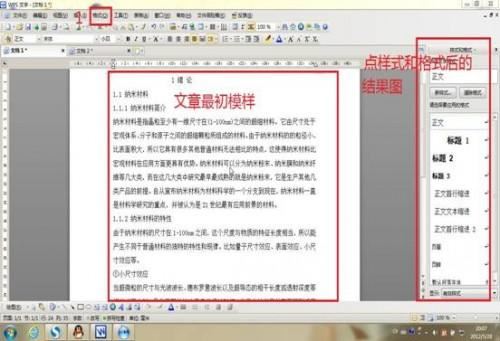
2、我们接下来是要修改“正文”、“标题1”、“标题2”和“标题3”的样式,如果你的文章有象“1.1.1.2……”的话那你还得把“标题4”的属性样式一下,以此类推。因为WPS里面默认的样式并不一定适合你那个学校的规定的论文格式。
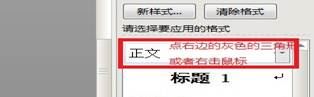
①我们在“正文”处点击鼠标右键,出现“修改”两个字,右击它。
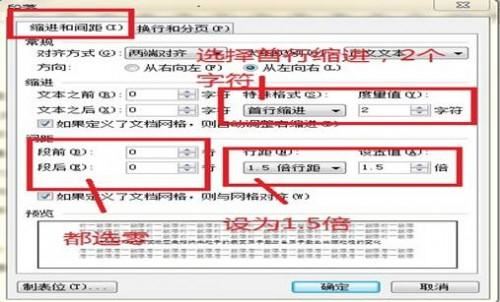
②在“修改样式”里面我这此字体选择“宋体”,字号选择“小四”,在中间的框中选择“两端对齐”和“1.5倍行距”。选好之后我们再点击最下面的红色框中的“格式”。
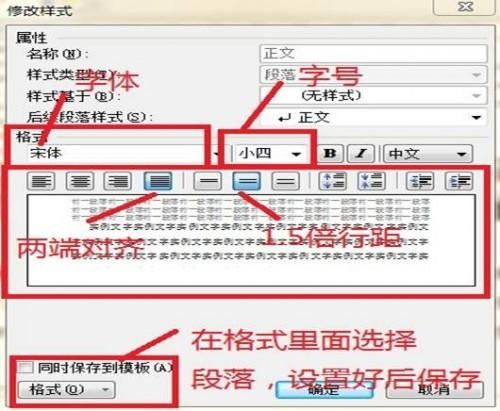
③点击“格式”后又出现一个对话框,在这里面我在“特殊格式”里面选择“首行缩进,2个字符”。“段前、断后”选择“0”。“行距设为1.5倍行距”。都设好后点击右下角的“确定”,确定之后又回到“修改样式”的对话框,在这里面我们同样点“确定”。
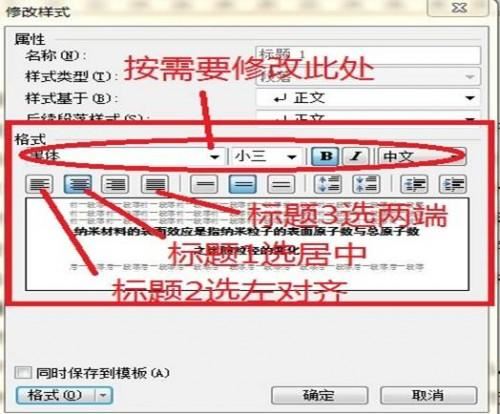
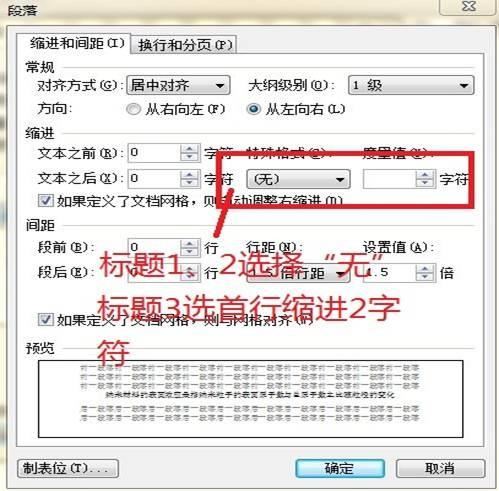
④“标题1”、“标题2”和“标题3”同样使用这种方法。不过值得注意的是其中会有些地方设置不同,具体请看下面两个图。
以上每次设置好之后记得在“同时保存到模板”之前打勾。
3、设置好之后,用“标题1”、“标题2”、“标题3”分别去定义文中的每一章节。比如,我们把光标点到“1 绪论”,然后用鼠标左键点一下右边的标题1,就定义好了;同样方法用“标题2”、“标题3”定义1.1、1.1.1;依此类推,直到全文节尾。
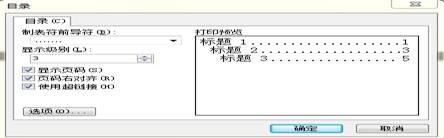
4、当都定义好后,我们就可以生成目录了。把光标移到文章最开头你要插入目录的空白位置,依次选择“插入”→“引用”→“目录”。接着会出现一个小窗口,我们点“确定”就可以了。
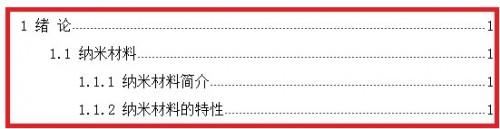
5、处理好后的图如下:
6、当你重新修改文章内容后,你需要更新一下目录,方法是:把整个目录全部选中,等变成蓝色后,在目录区域内,点右键,选择“更新域”,在出现的对话框中选择“更新整个目录”之后点“OK”就可以了。
WPS文档怎么自动生成目录?
目录制作一般经过2个步骤:
1、先设置标题:单击进入大纲视图→设置一级标题、二级标题,只需将光标点到标题行(每个标题均分别单击),然后提升标题,降级标题,逐个设置好了。再生成目录。 弄好了,前换到页面视图 。如果有的标题的字体、字号、行距不符合要求,最好切换到大纲视图选择显示级别到最低标题级别,然后直接看标题修改即可,这样最快捷。
2、然后插入引用→索引和目录→目录,选择一种格式。剩下的就没有问题了。
如果论文有四级标题,但是wps里面只有三级标题,可以单击进入大纲视图→设置,然后提升标题,降级标题,逐个设置好了,最多据说能设置到8级标题。
或者也可以:
1、用样式和格式功能设置好各标题样式;
2、选择好你要设置的标题在目录中显示的级别,定义好各标题的编号;
3、再插入目录即可(插入-->引用-->索引和目录)
WPS如何在编辑好的目录中插入?
1、将正文中的标题设置为不同级别的标题样式,如一级标题设为标题1,二级标题设为标题2.
2、引用——插入目录;或章节——目录页。 已经编辑好的目录,更改时,可右击目录任意位置,选“更新域”。
以上就是wps目录跟内容对不上的解决办法,希望大家喜欢,请继续关注脚本之家。
相关推荐:
论文正文出现在目录里怎么办? WPS部分标题在目录中不显示的解决办法
wps页码乱码怎么办? WPS文字目录和页码显示成代码的解决办法
相关文章
-

wps表格无法拖动怎么回事? WPS Excel单元格无法拖拽移动的解决方法
excel单元格中无法用鼠标左键拖动单元格中的数据,可能是由于单元格拖动功能没有开启,也有可能是别的原因,下面我们就来看看详细的教程2024-01-15 -
wps表格中宏应用很广泛,该怎么使用宏编辑器呢?今天们就来看看使用宏编辑器进行降序操作的技巧,详细请看下文介绍2024-01-15
-
wps的word文档如何添加logo? wps添加公司logo的技巧
wps的word文档如何添加logo?想要将公司logo添加到文档中,该怎么操作呢?下面我们就来看看 wps添加公司logo的技巧2024-01-02 -
wps表格如何拆分一字一格?wps单元格的内容想要拆分到不同的单元格,实现一字一格,该怎么操作呢?下面我们就来看看wps表格实现一字一格的教程2023-12-29
-
wps限制单元格输入内容? wps表格限制单元格填写当天的日期教程
wps限制单元格输入内容?wps表格中输入日期的时候,想要禁止输入当日日期,下面我们就来看看wps表格限制单元格填写当天的日期教程2023-12-29 -
wps表格怎么调整表格大小? wps表格一键调整合适大小格式的教程
wps表格怎么调整表格大小?想让表格大小随内容调整到合适的距离,该怎么设置呢?下面我们就来看看wps表格一键调整合适大小格式的教程2023-12-29 -
电脑wps和excel有什么区别? WPS和Excel的区别介绍
WPS和Office是两款备受用户关注的软件,在使用过程中,许多用户发现它们之间存在一些差异,下面我们就来看看WPS和Excel的区别介绍2023-12-28 -
wps有的功能是灰色的怎么办? WPS所有功能都是灰色不能点的四种解决办法
wps有的功能是灰色的怎么办?wpd中的功能是灰色的不能用,该怎么办呢?下面我们就来看看WPS所有功能都是灰色不能点的四种解决办法2023-12-28 -

WPS怎么输入㎡符号? WPS中excel表插入㎡符号的技巧
WPS怎么输入㎡符号?wps表格中需要输入平方米的单位符号,该怎么输入呢?下面我们就来看看WPS中excel表插入㎡符号的技巧2023-12-28 -
wps数据透视图怎么加标签? wps excel图表加数据标签的技巧
wps数据透视图怎么加标签?wps表格的数据做成图表以后想要添加标签,该怎么操作呢?下面我们就来看看wps excel图表加数据标签的技巧2023-12-28
最新评论