
一步步教你如何使用Java实现WebSocket
一、WebSocket简介
WebSocket协议通过在客户端和服务端之间提供全双工通信来进行Web和服务器的交互功能。
在WebSocket应用程序中,服务器发布WebSocket端点,客户端使用url连接到服务器。建立连接后,服务器和客户端就可以互相发送消息。客户端通常连接到一台服务器,服务器接受多个客户端的连接。
1.1 WebSocket协议
WebSocket协议有两个部分:握手和传输。客户端通过向服务端URL发送握手请求来建立连接。握手与现有的基于HTTP的基础结构相兼容。Web服务器将其解释为升级版的HTTP连接请求。
一个客户端建立连接的握手请求:
GET /path/to/websocket/endpoint HTTP/1.1
Host: localhost
Upgrade: websocket
Connection: Upgrade
Sec-WebSocket-Key: xqBt3ImNzJbYqRINxEFlkg==
Origin: http://localhost
Sec-WebSocket-Version: 13
一个服务端响应:
HTTP/1.1 101 Switching Protocols
Upgrade: websocket
Connection: Upgrade
Sec-WebSocket-Accept: K7DJLdLooIwIG/MOpvWFB3y3FE8=
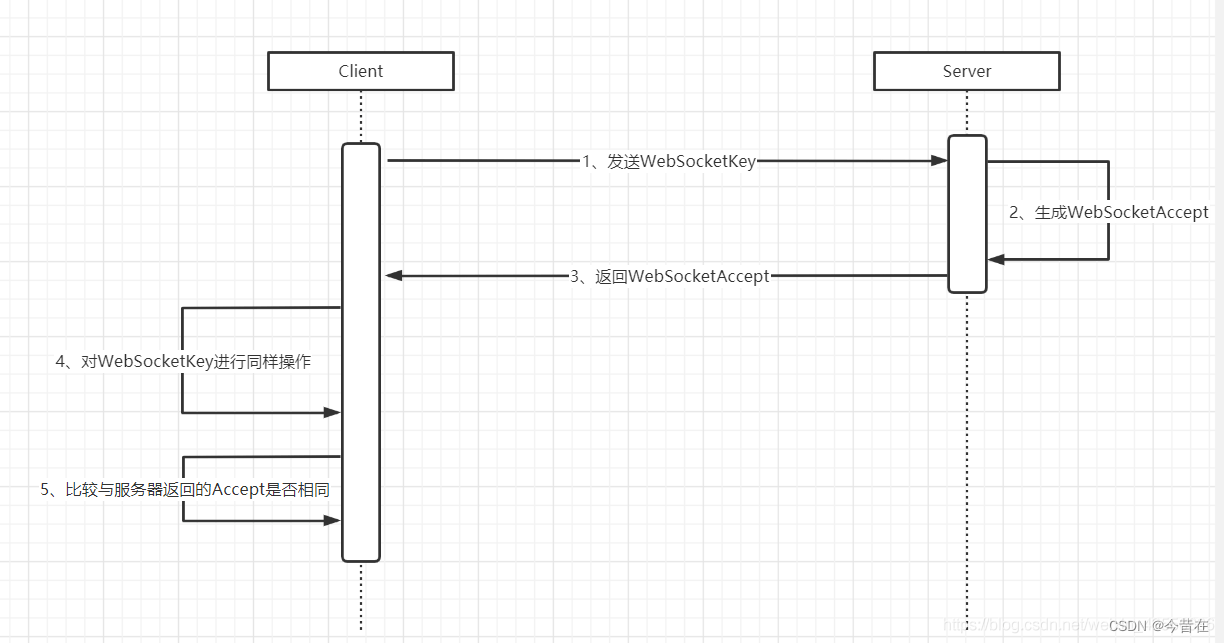
从上面的请求和响应中可以看出来,一个WebSocket连接的建立,需要客户端和服务端维护一个Key来作为该连接的连接凭证。
客户端向服务端发送WebSocketKey,服务器根据WebSocketKey生成WebSocketAccept返回给客户端,客户端对WebSocketKey的值再进行相同的操作,如果与服务器返回的Accept的值相匹配,就表示握手成功。握手之后客户端与服务端就互相发送消息。
1.2 WebSocket支持的消息类型
WebSocket支持文本消息(UTF-8编码)和二进制消息。WebSocket的控制消息由Close、Ping、Pong组成。ping和pong也有可能包含应用程序信息。
webSocket端点具有如下的URI形式表示:
ws://host:port/path?query
wss://host:port/path?query
- ws代表未加密的连接,默认端口是80
- wss代表加密的连接,默认端口是443
- path:表示服务器内端点的位置
- query:路径参数信息
二、创建一个WebSocket程序
创建和部署WebSocket端点的过程如下:
1、创建一个端点类
2、实现端点的生命周期方法
3、将业务逻辑添加到端点
4、将端点部署到Web应用程序中
**注意:**与Servlet相反,WebSocket端点类会被实例化多次,容器针对与其部署的URI的每个连接都创建一个实例。每个实例都与一个连接相关联。因为在任何时间都只有一个线程执行端点实例的代码,所以有助于保持每个连接的用户状态简化开发。
2.1 生命周期方法
EndPoint类中定义了三个生命周期方法:onOpen、onClose、onError
使用注解方式创建服务类
@ServerEndpoint("/echo")
public class EchoEndpoint {
   @OnMessage
   public void onMessage(Session session, String msg) {
      try {
         session.getBasicRemote().sendText(msg);
      } catch (IOException e) { ... }
   }
}
2.2 业务逻辑方法
@ServerEndpoint("/receive")
public class ReceiveEndpoint {
   @OnMessage
   public void textMessage(Session session, String msg) {
      System.out.println("Text message: " + msg);
   }
   @OnMessage
   public void binaryMessage(Session session, ByteBuffer msg) {
      System.out.println("Binary message: " + msg.toString());
   }
   @OnMessage
   public void pongMessage(Session session, PongMessage msg) {
      System.out.println("Pong message: " +
                          msg.getApplicationData().toString());
   }
}
注意:一个服务类最多可以有三个OnMessage注解,每个消息类型分别使用一种方法:Text、Binary、Pong
2.3 维护客户状态
有时在程序中我们可能需要在连接中维护一些用户参数,WebSocket也提供了这样的服务
Session.getUserProperties获取用户参数信息
如果要存储所有连接的客户端共有的信息,可以使用静态变量,但是需要用户保证对数据的线程安全访问。
@ServerEndpoint("/delayedecho")
public class DelayedEchoEndpoint {
   @OnOpen
   public void open(Session session) {
      session.getUserProperties().put("previousMsg", " ");
   }
   @OnMessage
   public void message(Session session, String msg) {
      String prev = (String) session.getUserProperties()
                                    .get("previousMsg");
      session.getUserProperties().put("previousMsg", msg);
      try {
         session.getBasicRemote().sendText(prev);
      } catch (IOException e) { ... }
   }
}
2.4 数据格式的编码与解码
由于客户端和服务端交互可能涉及数据格式的转换,所以提供了Decoder和Encoder的方式解决。
同时由于WebSocket的@Message注解只能有一个用来传输Text信息或Binary信息,所以要进行最常用的Json->entity转换解析就需要该方法
Encoder
Encoder.Text 用于文本消息Encoder.Binary 用于二进制消息
使用方法:
1、创建编解码类
public class MessageATextEncoder implements Encoder.Text<MessageA> {
   @Override
   public void init(EndpointConfig ec) { }
   @Override
   public void destroy() { }
   @Override
   public String encode(MessageA msgA) throws EncodeException {
      // Access msgA's properties and convert to JSON text...
      return msgAJsonString;
   }
}
2、在端点类注解中添加该Encoder
@ServerEndpoint(
   value = "/myendpoint",
   encoders = { MessageATextEncoder.class, MessageBTextEncoder.class }
)
public class EncEndpoint { ... }
3、这时候就可以发送MessageA和MessageB两种类型的Text数据
MessageA msgA = new MessageA(...);
MessageB msgB = new MessageB(...);
session.getBasicRemote.sendObject(msgA);
session.getBasicRemote.sendObject(msgB);
注意:webSocket会自动寻找使用哪种编码器,所以发送数据统一使用sendObject即可
Decoder
实现Decoder以将WebSocket消息转换为Java对象
Decoder.Text 用于文本消息
Decoder.Binary 用于二进制消息
使用方法
与Encoder类似
注意:与Encoder不同,Decoder最多可以指定一个Binary和一个Text类型的Decoder,如果有两种以上的Java类型作为文本消息进行发送和接收需要进行定义处理。可以使多个消息继承一个公共的消息父类
1、编写Decoder类,对收到消息类型的不同进行不同的解码
public class MessageTextDecoder implements Decoder.Text<Message> {
   @Override
   public void init(EndpointConfig ec) { }
   @Override
   public void destroy() { }
   @Override
   public Message decode(String string) throws DecodeException {
      // Read message...
      if ( /* message is an A message */ )
         return new MessageA(...);
      else if ( /* message is a B message */ )
         return new MessageB(...);
   }
   @Override
   public boolean willDecode(String string) {
      // Determine if the message can be converted into either a
      // MessageA object or a MessageB object...
      return canDecode;
   }
}
2、在端点类中添加decoders={MessageDecoder.class}
@ServerEndpoint(
   value = "/myendpoint",
   encoders = { MessageATextEncoder.class, MessageBTextEncoder.class },
   decoders = { MessageTextDecoder.class }
)
public class EncDecEndpoint { ... }
3、在@OnMessage方法中使用
@OnMessage
public void message(Session session, Message msg) {
   if (msg instanceof MessageA) {
      // We received a MessageA object...
   } else if (msg instanceof MessageB) {
      // We received a MessageB object...
   }
}
总结
到此这篇关于如何使用Java实现WebSocket的文章就介绍到这了,更多相关Java实现WebSocket内容请搜索脚本之家以前的文章或继续浏览下面的相关文章希望大家以后多多支持脚本之家!
- Java中使用WebSocket的几种方式
- Java实现使用Websocket发送消息详细代码举例
- 如何在Java中使用WebSocket协议
- springboot整合websocket后启动报错(javax.websocket.server.ServerContainer not available)
- Java WebSocket客户端接收大量数据的三种方案
- 使用Java WebSocket获取客户端IP地址的示例代码
- Java中实现WebSocket方法详解
- 教你如何使用Java实现WebSocket
- java后端+前端使用WebSocket实现消息推送的详细流程
- JAVA 日常开发中Websocket示例详解
相关文章
-
 这篇文章主要为大家详细介绍了利用HttpClient实现文件上传,文中示例代码介绍的非常详细,具有一定的参考价值,感兴趣的小伙伴们可以参考一下2022-08-08
 -
 java 中equals函数的使用方法是广大java爱好者所关心的一个话题,本文将详细介绍其使用方法,需要了解的朋友可以参考下2012-11-11
 -
 这篇文章主要介绍了Java数组的基本操作方法整理,是Java入门学习中的基础知识,需要的朋友可以参考下2015-08-08
 -
 这篇文章主要介绍了JPA查询部分字段的相关事项说明,具有很好的参考价值,希望对大家有所帮助。如有错误或未考虑完全的地方,望不吝赐教2021-08-08
 -
 这篇文章主要介绍了Mybatis配置文件之动态SQL配置备忘录的相关资料,需要的朋友可以参考下2017-05-05
 -

基于@Valid和@Validated验证List集合的踩坑记录
这篇文章主要介绍了基于@Valid和@Validated验证List集合的踩坑记录,具有很好的参考价值,希望对大家有所帮助,如有错误或未考虑完全的地方,望不吝赐教2024-07-07 -
 这篇文章主要介绍了Java函数式编程(十一):遍历目录,本文是系列文章的第11篇,其它文章请参阅本文底部的相关文章,需要的朋友可以参考下2014-09-09
 -

设计模式系列之组合模式及其在JDK和MyBatis源码中的运用详解
这篇文章主要介绍了组合模式及其在JDK和MyBatis源码中的运用,本文给大家介绍的非常详细,对大家的学习或工作具有一定的参考借鉴价值,需要的朋友可以参考下2020-09-09 -
 在高并发系统中,出于系统保护角度考虑,通常会对流量进行限流;不但在工作中要频繁使用,而且也是面试中的高频考点。本文就为大家整理了5种Java中常见限流算法,需要的可以参考一下2023-04-04
 -
 这篇文章主要给大家介绍了关于Java中类加载机制的相关资料,JVM将类加载过程分为三个步骤:装载(Load)、链接(Link)和初始化(Initialize),本文通过示例代码介绍的非常详细,需要的朋友可以参考下2021-09-09
最新评论